My project proposal is a story of a murder in London, England, United Kingdom in September 30th 1888 early morning at 1 o’clock in the morning where the murder of another Jack the Ripper victim happend. The backstory consists of a serial killer, Jack the Ripper, on the loose slaughtering countless victims over the months. A particular event the project will be set in is the murder of Elizabeth Stride in Berner Street in 1888. The killer enters a social club, crowded with locals. He lured her in to a private area where no one can see what’s going on and then violently kill her with a blade. Straight after the murder, the police came into the scene finding the bloodied victim. Police bobbies realised that there is a trend of people getting murdered in a oddly specific fashion, Isolated then slashed and bludgeoned to death. They start to take notice and memorised how each murder victim could have only one killer.
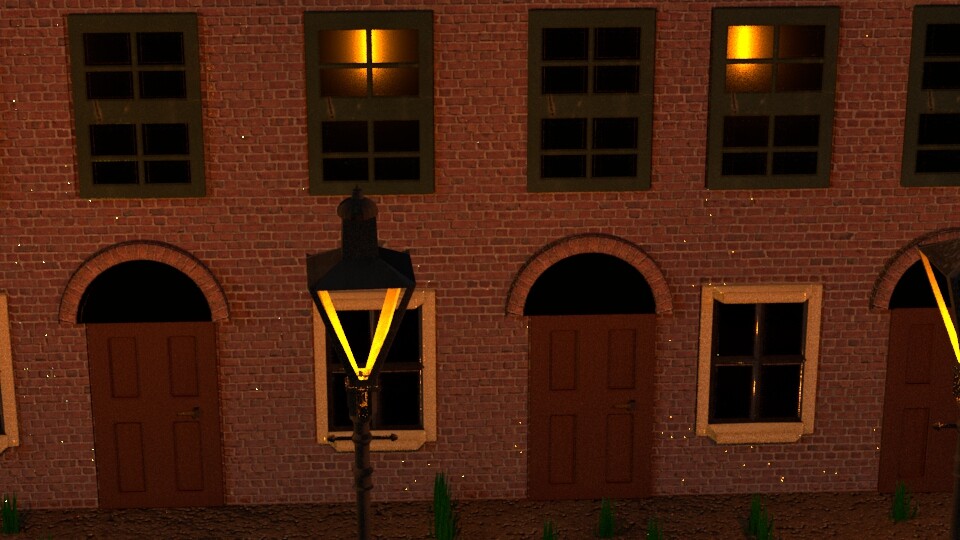
The style would be an antique effect (with brownish colour), with the fog atmosphere to give the 1800s London athletics. Speaking of a brownish colour, all the buildings will be bricks, with an exception of a white stone wall. There isn’t much lighting as it is set in night. However, there will be streetlights and lights from windows, all in the dark yellow colour.
In terms of legal reasons, especially copyright, I will have generic names for all placed to avoid any disputes with a trademarked company. For example, every shop will be called “the shop” just to play safe. Only use royalty free sounds off the internet or sounds that I recorded myself from scratch using software will be used for this project, especially music. I have also noticed that the Jack the Ripper killing story is saturated by many other producers and artists. I have chose the 19th century London for the reason that there was enough evidence, easy to find, to create the scene from scratch. When it comes to using the textures, I will be careful on using certain textures to ensure that I have the right to use them and will credit the original creators of the textures.
In terms of ethical reasons, the killing itself will not been shown, apart from the screaming and the aftermath to have the content decent enough for it to be passed as acceptable college work rather than a shock factor. The age rating has automatically relegated to a low priority as it portrays a brutal killing of a woman, which happened to be an erotic worker to keep men company.
There isn’t much to worry about in terms of confidentiality as I am the only one working on this project. However, only the main characters will be named. If anybody doesn’t want their names mentioned in the project, I will leave them out.
Moodboards
These images are a good reference because it covers the street in all corners and diagonals. It also covers the materials used in the buildings and what the buildings looked like, which will help me better understand the appearance, therefore I can create more believable environments.I created a third moodboard to cover the general theme of the environment. It covers the stereotypical views of 1800s Britain from Queen Victoria to the long hours of the 2nd Industrial Revolution. This will set the mood on what type on environment I would be creating.The greatest benefit is that there are not many assets to create, which gave me the upper hand to focus on the very few assets I have to create in high quality. It looks disorganised because I tried to create a landscape moodboard and it ended up being loose on one side. On the other hand, there is enough detail on the image reference and the materials have been pointed out to ensure that I create the models as realistic as possible.
Asset list
•Horse carriages
•Knife
•Dead victim
•posters
•Buildings & chimneys
•Gaslight lamp
Diegetic and non-diegetic sounds
Diegetic sound: are sounds that both audience and the characters can hear. Generally used to create an environment the director wants to portray. Examples such as talking, explosions or vehicles passing from a distance. I will use the diegetic sounds for everything else such as doors opening, conversations, dialogue, stabbing, dropping the body, etc.
Non-diegetic sound: Sounds that the audience can hear, which cannot be heared by the characters. They are used to create suspense to scenarios which otherwise would be a silent environment. Examples could include soundtrack (music) or narration. I will only use music as a source of non diegetic sound to effectively emphasise the scene to ensure the audience feels the same fear that the victim faced.
This is one of my more detailed frames recreated digitally, without colour. I will use this as reference to modeling the scene.This is my attempt at drawing concept art. In my standards, it is not bad at all compared to my other drawings. The greatest benefit were the detail because of the shadow and the accuracy.This is a digital version. It may not be as realistic as I’d like, though it does cover the background and the essential details. The greater benefit of this digital sketch is the colour. This is because I could show colour easier to see compared to a scanned colourful paper where detail is lackcluster.
Storyboards
This is my basic storyboard on what could happen if I create a story on the environment.I then recreated the image using the digital methods of art such as colour and tracing over. In terms of colour, it has much improved from the paper version because it brings the image to life and know where the colour goes.
For this project, I will be using Autodesk Maya for the modeling itself on top of Photoshop for texturing. However, the twist is that I won’t be using any lambpert or blins for this project at all. Instead I will be using something called “AiStandardSurface” that covers both and in higher quality. Furthermore, I will be setting a project directory which will have the models, UV snapshots and textures in one convinient place. I will be using the references from the scan ins and the images themselves to accurately recreate the scene that I intend to recreate.
I immidiately began the modeling project by creating a new project directory relating to the urban environment assignement. Soon after, I inserted the reference images, a model biped of a human for scale along with creating the foundations of the models.Using my references I began by crating an arch for the door. Unfortunately, they were not smooth, even with the bevel tool. Nevertheless, I began to experement with the cylinder (polygon primatives, tickbox) to edit the amount of faces and edges to flat out the roughness of the shape itself. However, none of these turned out to be successful as portrayed in the image. Few have created major ngons and others created too many faces.Eventually, I have created a cylinder, now cut in half, which is more round than the previous attempts without using excessive faces.Side by side comparison of my original and improved arches. The difference is obvious. Improved geometry and smoother edges.I have used the isolate tool to separate the lower window and the rest of the scene to focus on the geometry. The initial purpose is for animating the open and close window whenever needed.In order to keep the progress safe, I decided to duplicate the original model. This is because I can easily go back and delete the edited model when it doesn’t go as expected along with saving time to remodel the window from the beginning.With the edited model, I have deleted everything else, except the bottom window panels.I now have the original model, the window model without the bottom and the panels themselves for the intended purpose of additional realism (because windows are often never still) and potential rigging if required.Using the reference image of an asset. I have created a model reference for the streetlight starting from a cylinder shape. I have also duplicated the model to continue on the modeling, therefore I could go back whenever it goes wrong.Despite the window looking clean on the surface and appear to have good geometery. The reality is that it has many ngons that are hard to fix. This does include being almost impossible to fix it with multi cut tool.The wooden back door had to be remodeled in order to fix the geometry. Afterwards, I have only beveled slightly to smooth out the rough edges.On the side of the building, there is a huge gap between the rest of the windows and the end of the side wall…… To resolve this, I had to drag out each side of the wall to expand the size with the result of closing the huge gap.I have used the isolate tool to focus on the lamp main body as it has excessive amount of edges that wouldn’t be used or visible on the model itself.I have managed to delete the faces, as well as the vertecies by using Ctrl+ Del keys to remove both edges and vertices.I decided to start over with a new cube, stretched out to the original shape along with edge loops inserted.Then I have extruded the window panels themselves inwards without connecting to edges to create even panels.Afterwards, I have used the bevel tool to smooth out the hard edges to appear more realistic. There were no engons or lone edges or verticies in the process.I inserted a skydome to use it as rendering later on, despite it was a short task.I began unrwarpping the texture by starting with the ground itself. Using planar while selecting many faces, I have created UV shells.Due to poor geometry of the original building model. I have decided to start over, same as the lower window process.With the sky dome, the temperature was changed in kelvin to give a blue colour and rigged in the dark colour.I have used texel density texture to test the UVs before texturing it in Photoshop. So far, the texel density were appropriate apart from a few changes (i.e. one bit of arch rotated to allign with the rest of the arch side). On top of that I have also copied the entire environment to experiment on texture before confirming the final version.I have slimmed down the main wall in favour of a higher texel density, despite compirimising the top and sides.I have opened up Photoshop to easily texture the UVs. This screenshot shows the brick wall as an example. After I have saved the texture in Photoshop format, I save it again as a TARGA file.Using the Hypershade window (window, rendering options, hypershade) I could edit the texures further, rename the texutes to an appropriate game (ie.from AiStandardshader2 to “wall texture”), on top of inserting a normal map for additional details.Unfortunately, the texture had to be changed from my original brick texture from a new brick texture (despite it wasn’t originally in the plan at all). The major difference between one shown in photoshop and this image is the consistancy because it shows no light throughout.The textrues of the arches (with bricks) also had to be changed to match the size consistency with the main wall. Therefore I had changed the texture to expand the size of the brick images themselves.I decided to create a normal map via Photoshop by going to filters> 3d> generate normal map, which will greet me to a window which I could edit the intensity of the normal map.This is the result of using the normal map on the texture. It makes the street pebbles stand out and appears more as a road surface rather than gloss.I have finally recoloured the texture of the lower window to match the reference of the images in real life.I seperated the head of the lamp post and duplicated it to first remove the big side faces to represent the glass. Afterwards, the same process was repeated in reverse (everything else, but the main faces).The same process was then used in the windows and the door arch. It involves duplicating the objects and separating both the window panels and the objects themselves.Soon after the process, I have created the glass surface using standard surface. However, I had made a safe copy just in case the objects go wrong.I have modified the original certain textures (the back) to add dark red flake splatters to appear as blood. I have applied this to the back arch, the street surface (ground) and the brick wall along with the poster on the back.This is the final result of the re texturing. This now appears more as a murder scene, rather than just an ordinary street.I had to redo the UV map in order to fix the arch problem in the textures. To do this, the unfold and straighten UV tools were used and this was the result.The texture was then redone in Photoshop with consideration that the bricks had to be large to match with the wall for consistency.I then add red splatters to represent blood in a murder scene.This is what a rendered scene looks like at the moment, using Arnold render. Although the brick texture is black when its rendered due to a mistake I will be solving later, which involves the weight. Everything else looked perfect.I added in the polygon cubes, then edit them to appear as grass strips. This was done by resizing the shapes in object mode and thinning the top face via vertex.The next step was to join the grass blades together into a group and unwrap each one. Fortunately, I had a short cut to only export one and use the whole block as a green colour in Photoshop which would save me time and storage.after using Photoshop to add a green colour to represent grass. I had combined all the meshes and implemented an aiStandardSurface texture for the entire grass and moved it to the front.I had duplicated the grass mesh by Ctr+D and scattered the meshes across the front scene to appear less repetitive and more interesting.I opened up render settings > Arnold Render to then go onto Environment to inport an AI fog for effect.The result did not turn out as planned as the supposed fog now coveres the sky dome, resulting in an unnatural yellow sky.I decided to use another skydome texture. For this, I downloaded a night texture from HDRI Haven for a better quality skydome, rather than just a singular colour.I had created a new camera, by routing through Create> Cameras> camera. The camera was then named into rendercam1 to avoid confusion with the perspective camera.Then I created keyframes to the render cameras along with adding more render cameras for covering different views. I went to multiview to test out the render camera with the keyframes. Prior to keyframing, I ensured the cameras were at the correct position.Then I created a mesh to create into Arnold light for the back scene to prepare for a still render later on. I had chosen a warm temperature at a level 100,000 intensity and a level 5 exposure because it worked best as it appeared to be a scene from a city.I narrowed the view to simulate what the render camera would see. That way, I would avoid having to redo the renders many times to get the right view at an acceptable distance.In preparation to my batch render, I went to render settings (the one with the movie clipboard with gears). I ensured that it was a jpeg format and the order goes “name000.jpg” otherwise it wouldn’t work as tested as “name.jpg.000” which only created its own file extentions. The first test was only 10 frames, to then finally be used in all 120 frames.Unfortunately, I had to use a lampert despite trying to avoid them throughout the project. However, it came with a good result as the poster appear more as paper, rather than a block. To achieve this, I had used the translucent tool to later on colour in black and white for toggling visibility in the render.I had opened premiere pro and created a new project, only to drop all the renders (still renders and a sequence.Next, the still renders were spread out to sync with the music. On top of that, I used the opacity keyframes for the purpose of fading in and fading out.I then realise that I needed more than 4 tracks. So I went to Sequence> Add tracks to only insert 3 more in the audio tracks which results in a total of 7.I created text in both the beginning and end of the video with relevant text as shown in the screenshots. The same opacity fade in and fade out also applied to the title in the beginning, though not the end as it was credits scrolling up.In the end section, I had alligned the text to be at the centre. Next, I positioned it at the bottom at the beginning to end up at the top in the end using keyframes.Before I loop the audio, I needed to ensure that the audio was cut at the right place to loop naturally. The audio level had to be considered too, therefore I had to make sure that the audio was at the correct volume that I wanted it to be by using volumes throughout. Secondly, I began to loop by duplicating multiple audios and connecting them together. I did found a way to simplify the process using Adobe Audition, however it didn’t work because the audio sample was too short to remix.After everything else was completed. I then go to File> Export> media and exported the video in 2 different formats (.mp4 and .mov) as I was working with Windows and the MOV was only compatible with apple. Afterwards, I clicked on export with an appropriate name and file location.
However, I realized that I only needed the moving render only. Nevertheless it was an easier task as I already got the sound sorted. It was a matter of shortening it with deleting the still renders and returning the moving render to normal speed. Then it took readjustments with the audio keyframes to allign with the short 4 second video to finally export as a different media at the same format.
The research and development was initially a tricky task, as I had a plethora of idea combination to choose from as my project. It ranged from London in the 1800s to New York at the 21st Century. I ended up picking the idea that I created the entire project of (London 1800s), because of the sufficient amount of reference to create a scene. Everything else in terms of pre-production, including gathering the textures, sounds and drawing concepts was the most difficult aspect of the entire project. On top of that, it took me forever to draw simple storyboards and concept sketches, mainly because art is not my talent or passion, also it is difficult for me to create detailed art. To circumvent this, I just did the basic drawings with new techniques and slightly higher detail with shadows.
Production
From production onwards, everything became easier because I enjoy 3D modelling and unwrapping textures, on top of texturing and rendering. However, sometimes the modelling tasks can be rather irritating in terms of creating the model I wanted with acceptable geometry with no ngons or overlapping faces. In the end, I was impressed by creating an entire scene with under 20,000 polygons, which was a major achievement especially in terms of performance.
Unrwapping task was easy at first as I focused on the easier models such as the house body (block) to the more complex UV maps, for example a lamp post with many parts.
Texturing on the other hand, was a simple task as it only involved me inserting the colour map and normal map as geometry. This was the case until I had encountered an unpleasant surprise. The brick texture had not been consistent throughout the board, therefore I had to start over with the brick texture from a new source. The results were much better as consistency was now shown across the board, meaning that there are no light spots.
Post-Production
Post production was the easiest out of the 3 stages as it doesn’t take as long to complete.
I began the process by adding the light meshes inside the lamp and the back of the scene where only light is visible. Afterwards, I went to HDRI Haven to get a new skydome texture most appropriate for the scene. All this was used in Arnold shaders rather than traditional Maya lighting as I was rendering in Arnold.
Speaking of rendering, I had created 3 still frames which covered each angle of my work to emphisise the quality. On top of that, I did a batch render which involves rendering multiple frames in a sequence. The process was the easiest in the post production phase.
Premiere pro was slightly trickier as I were unsure what to include in the render video on whether to include all 3 still renders and a video render or whether to only have the video. I decided to create both, just in case therefore I wouldn’t hassle on creating a video in a rush. I had inserted a few sounds and all of my renders to create a video. The trickiest part was managing the audio.