Types of Animation
The 3 types of animation this post will cover is the traditional cel animation, stop motion and 3D CGI animation.
Traditional/hand drawn/Cel animation
History
The history of hand drawn animation actually goes back from 1609, where a projector device was created to project each image frame and was designed to show frames to a wider audience and it surprised them at the time because they thought that technology was impossible. Better yet, the audience thought it was real even though they are just moving slides. Although it isn’t technically animation as one person is required to move the slides, it was a breakthrough to become something no one would thought would be so influential to daily lives via multiple breakthroughs in centuries to come.
In 1914, there was another major breakthrough when Gertie the Dinosaur was created, which effectively became the first animation with a major character, which appealed to the audience. However, there was no sound and instead there was words that have their own frames creating dialogue.
Despite being numerous examples of animation before the 20th century, no animation has took of like steamboat willie did, which was the first debut of Mickey mouse from Disney. During the Great Depression, animation has become more popular with examples being Snow White and the Seven Dwarfs (from Disney) in 1937 which made the American public forget the financial struggle. The films were also known to be the first with a full soundtrack, including music and sounds created from scratch by Walt Disney himself.
Workflow
Back in the day of early animation, there were no computers, so everybody had to do their own part and assure that the sounds are played at the correct timing and order as technology was limited to only 1 layer which meant that each frame had to be drawn by hand and the animators had to keep looking back to the previous sheet to check that the slide that they are working on is accurate. However, a revolutionary breakthrough was made when cel paper, which was basically rice paper, was discovered to be used for tracing previous slides without having to constantly check the whole frame, although checking is require to ensure detail of the frame is matching. The equipment needed for cel animation (the most common category of hand drawn animation) are rice paper, pencil sets for each colour, a light desk, paints, brushes, art gum erasers and peg bars.
The reason they use art gum erasers rather than standard rubbers is that the art gum doesn’t erode paper and clearly erases the mistakes in drawing without a trace, which the rubber cannot do.
Effectiveness
The advantage is that the final result is satisfying to both the consumers and the producers, which would encourage the directors to produce more animations.
There is also an advantage that work is more practical with using real props to create sounds from scratch and there was a science lab in the disney studio, presumably to create colours.
The drawback however is the complicated process of hand drawn animation, especially in the early days as they have to draw each frame from scratch. This would mean that it could take weeks to create a 1 minute animation.
Referencing the process of cel animation, the colours are very difficult to extract as they take up time and actual resources to create the exact colour that suits the character compared to digital animation.
Stop Motion
History
Stop motion has always been a part of animation since the beginning in 1609, when the first projection was broadcasted on stage.
Technically, every animation is stop motion because it moves position per frame. However, some animation has frames that move so quickly it is barely noticable and people proceed it like it is a real moving animation. Nevertheless, in recent years there has been some animation that has features of frames smoothly transitioning. For example in a software called Adobe After Effects, there is a function called keyframing. This involves individual keys having a transition between one position and the other, depending how far away the key frames are.
However, the stop motion genre didn’t really come onto its own until the first few stop motion lego movies created by fans were uploaded to the internet in the mid 2000s that got people interested of watching them of creating stop motion films of their own. Initially cameras were a rarity as they were unpurchasable at the time for an average civilian. Then in the 90s the frame is actually short video clips as computers were limited to only a few people throughout the world. In the 80s, brickfilms were being captured by vhs recorders, which allowed the director to overlap mistakes, therefore more forgiving. Sound had to be recorded at the same time with frames as there were no software to mix and combine the video and the audio together, such as today. There were edits through cassette tapes and the old fashioned process was complicated and required many steps.
One of the first stop motion films in the brickfilm category is the Magic Portal, complete with colour changes and walking animation for the characters, back in 1989. If you notice the small details, you can see there are lighting spots, which emmerses the realism of the environment to the audience.
There were popular stop motion films such as “The Nightmare Before Christmas” where they have all the assets physically modeled and took each photo a frame. In fact, the earliest examples stop motion film to be produced is the zoetrope horse created back in 1878, where it involves frames organized in a cylindrical form to be designed to loop continuously, giving the illusion of the horse continuously moving.
There is a style of stop-motion animation, which was the alternative to CGI before CGI existed. It is called claymation, which involves animating the models made from clay and moving them ever so slightly to give the illusion to the viewers that the object is moving on it’s own. For example, a clip from 1933’s hit King Kong shows King Kong being knocked down from the Empire State building by an aircraft. However, in closer detail you can see that the animation is choppy for the gorilla, which is the beauty of stop motion.
Workflow
A typical stop motion animation has a low frame rate with approximately 5 frames a second, some are higher and others are lower. Stop motion is popular in the entertainment industry and is also used for educational videos. It involves a camera person taking a photo for each frame and would have to move around with the environment to make it seem like the environment is alive. This includes not only moving the character, it is also ensuring that the environment moves too. In other words, a building being demolished would have a few frames before being completely on the ground with bricks on the air in a lego movie. Usually for a character, there would be multiple heads per character for each expression. When it comes to editing the movie, special software such as Sony Vegas may be required to merge all the frames together to create a film along with fitting in audio and special effects.
Effectiveness
Advantages of stop motion is that the impression of being more creative because it is used for truly imaginative videos, especially in commercial and music. Therefore it stands out more compared to other videos. Sometimes it can enhance the beauty of films and it captivates a imaginative story which will appeal to the intended audience.
The disadvantages of stop motion is that it takes a long time to create a single frame, depending on how frantic the scene is and it could take weeks to create a short film (e.g. 5 minutes) because each frame is different. This means that the environment has to move along with the frames to animate the scenes. The effort needed to create a one minute video is tiresome and can drain the energy of a director. However, it is not as time consuming compared to traditional hand drawn animation.
3D/CGI Animation
History
CGI is one of the newest form of animation from the examples such as Toy Story from Pixar in 1995 and Avatar, directed by James Cameron in 2009. The GCI stands for Computer generated Imagery.
Computer graphics actually started in the 1950s developed by United States to accurately calculate projection of their missiles, which was so interesting at the time, that it actually motivated the computers to be worldwide. Later on in 1963, sketchpad was developed as an interactive software that processes computer graphics. What makes sketchpad so special is that the computer can later on alter the lines to smoothen the drawing. In 1976 a technological milestone has been reached. Based on the sketchpad which was mentioned earlier, the developers have figured out a way to draw in 3 dimensions. However, the University of Utah had took it a step further to create a realistic teapot, complete with lighting, textures and bump mapping (normal mapping of its day).
Workflow
Using a computer, a few softwares to create models, environments, soundtrack, etc. 3D animation has become the norm in the digital age, mostly because of their time efficiency and its ability to create high detail models. They follow a pipeline which goes from concept/ storyboards, 3D modeling, texturing, rigging, animating, lighting, camera adjustment, rendering, composting and special FX, implementing soundtrack (including foley sounds) and then editing, in that order. Ideas are usually developed during meetings such as what the story will be and how it would progress.
The software required to create 3D animation films are Maya, Z-brush, Photoshop, After Effects, Motion Builder, etc. The point is, that there are so many software that professional animators use to create 1 film and companies may have software of their own, such as Disney uses Houdini to enhance visual effects.
Effectiveness
Advantage is the frames are easier to create and it helps because it cuts out the labour required to produce a film from thousands to potentially one person crafting an entire film. This means that costs are lower in theory because fewer workers are required to do the same job, which can save thousands or millions for a company. However, it may not change much cost wise because the producers will constantly have to update their computers and their software that they work with to keep up with the product demand, as they attempt to impress their intended audience each time.
The 3D modeling assets, believe it or not, can be used for other projects from their previous ones (with a few tweaks to match the style of that animation). Therefore, less time can be spent creating the animation itself. This means that the overall cost of labour would be cheaper for directors and projects would be finished sooner, rather than having to individually remodel the asset even though the same models were in previous movies anyway.
Sinche the work is based on the computer, the disadvantage would be the computer limitations, even today, because the computer can only hold so much polygons and models in one scene. This is the reason why video games are not perfectly photorealistic yet. On the other hand, today’s situation is a lot better than what it was back in the early days such as the 70s or even at the time the first toy story was made. This is because multiple technological advances has been made throughout the decades, although we are far away to the ideal machine that has unlimited power.
Fun fact. There is a possibility of an entire project being corrupted or even deleted by accident, therefore ruining the entire process of a 3D film animation. This nightmare exactly happened to Toy Story 2 whilst it was in development. It was so bad that the movie was almost cancelled. The incident was a dark reminder to always backup files in another location.
Sources:
https://www.arena-multimedia.com/softwarecovered.aspx
https://www.imdb.com/title/tt0107688/ (year Nightmare Before Christmas was made)
http://sites.middlebury.edu/videographiccourse/2017/11/29/360-zoetrope-the-horse-in-motion-1878/
https://history-of-animation.webflow.io/
https://www.lifewire.com/art-supplies-for-the-traditional-animator-141011
The 12 principals of animation glossary
Squash and Stretch
Squash and stretch is an exaggeration method of animation changing from one position to another. This principle of animation alone will emphasize on what material is bouncing as not all materials are the same. In real life hard material wouldn’t as bounce as much as the softer materials.
One example could be bouncing a ball when the ball stretches when it bounces. To do this the arc process will have to be completed first, then between the bouncing animation (before, whilst and after hitting the floor).
Anticipation
Anticipation is a principal where a certain moment is slowed down before the action takes place. It is also having additional frame to increase the tension of the animation.
For example a punch animation would have an in-between and then slows down the pre punch before hitting a character to emphasise the irony and the strength of that punch.
Archs
Arch is a directional movement, usually associated with bouncing with enhanced realism. The arches start in large curves and gradually shrinks in size for each bounce.
However, they are used for character movements, such as an arm, to smoothen the movements to become lifelike instead of artificial. Therefore, this technique will improve the overall appeal of the animation.
Ease in and ease out
The process of shifting speeds between the frames of the object. In detail it is a alteration of the pace of the animation, even though the whole animation has the same frame rate per second.
An example of easing is the train arriving, gradually slowing down before reaching the station.
Appeal
Appeal is a art style of animation in general. It is used to give a character more shape and personality, especially in cartoons. The process begin by drawing basic shapes to plan out the proportion of the character, then the size is adjusted to match the desired appeal to the animator.
For example a bodybuilder may be short and have little legs, although have huge torso and arms.
The whole purpose of appeal is to keep the design simple and at the same time iconic.
Timing
Timing is the pace of animation. The amount of frames determine how fast or slow the animation is. Fast animations usually have fewer frames than the ones with more frames, although there are a few exceptions such as 60fps.
Timing and staging go hand-in-hand with animation, especially for a comedy as it is important to get the perfect timing to create the most impact on the humor.
Solid drawing
Solid drawing stands the character out with thick outlines. In some cases, it makes the object look more 3D than if the outlines are thin.
Solid drawing enforces the 3 elements of ensuring that the shapes look 3d, via volume, weight and balance. For example, cubes should not be parallel, otherwise it would look too flat to be 3D. In other words, try not to be perfect to improve the solid drawing, especially when it comes to spheres. Spheres will need an asymmetrical outline, instead of the perfect cross. This is because it kills the illusion of a continuously curving shape and instead will look similar to a logo.
In a nutshell, it is the basic shapes of the character that mustn’t be neglected. One example could be a character would have a sphere torso, a sphere head and cylinder limbs (includes arms and legs).
Exaggeration
Exaggeration as a principle on animation is where objects over-react to their actions. Exaggeration enhances the impact to directly communicate the amount of effort or pain for each action committed by the character.
For example a bouncy ball may squash and stretch too much to the point where it look like a completely different object.
Pose to pose
Pose to pose is a method of drafting the animation to point out where the start point and the end point will be. It will then be followed by a second layer of pose to pose to fill in the gaps and then third layer to add even more detail to the animation.
One example could be a character walking from one end to the other. Starting with the start points and the end points first, then animating the inbetween.
staging
Staging is designed to be obvious enough so that the audience wouldn’t look away. It communicates directly to the mood and theme of the scene intended.
An example could be a guy slipping through a banana, then suddenly a crowd of people pops out and laughs at him.
Secondary action
Secondary action is another action that move the same with the primary action, to add emphasis and detail of the event. It can also change the context completely, from a character lying down looking dead to “z”s flying across to imply that he is actually sleeping.
One example could be a bubble coming out of the character’s nose whilst sleeping.
Follow through
Follow through is similar to pose to pose. On the other hand, there is one major difference between the two. Follow through, has a process of drawing frames in order instead of skipping frames to fill in the gaps.
Follow through principal works well in special effects such as fire or wind gust and it looks more organic as a result than if it did pose to pose.
It can also be used as an add on for detail, such as hair or bunny ears to appear more realistic as it is never perfectly straight in real life.
references can be linked through these pages:
The animation project
What I expect in my final animation is the suitable timing of key events to smoothly transition one frame to another. I also have to consider that the animation has to be short and sweet, as it can last no longer than 10 seconds.
This is my storyboard for my animation. I am working on a jump scare for my character.


This is my mind map, which expands to cover every corner of detail of the animation and how the animation will play out

This is a simple moodboard to inspire myself on what I should be thinking about whilst animating a jump scare. On the left side, there are various reactions of scared faces and things that are considered scary, from spiders, to creepy corridors.
Image sources from moodboard:
http://www.i2symbol.com/stickers/smileys/frightened-face-b82295f3012fa0efb9be60a09deef530
Key poses for my animation:


In a sophisticated slideshow, these are my key pose references I have used for my character. They range from walking, head up, crouching, jumping and fallen. I use these to point out where my character is heading after each frame as a reference.
The 5 main principles I will be applying to my animation are
- pose to pose
- secondary action
- follow through
- timing
- exaggeration
self-assessment questions (29/01/2019)
- What steps of the project have you completed?
I have completed the planning stage including the moodboard, mindmap and a storyboard. Then I have completed the animation itself from start to finish, even the inbetweens.
- Which steps of the project do you need to still complete/add more to?
Even though my animation is practically finished, I still need to refine my work as I have noticed the foot has gone through the floor a few times.
Afterwards, I will need to render my frames to create a video and then evaluate it. I also need to upload my moodboard and mindmap to my blog to cover detail to the planning.
- What grade are you aiming for?
Ideally I would aim for the highest, a distinction. However, I felt that my work is not good enough to meet that standard. This means that I would be aiming for a merit at the very least.
- Looking at the table what areas do you need to work on to meet that grade?
Based on the grading table, I still need to add additional detail to my research questions to cover a further range of examples, which includes the principles of animation. I will need to apply the story to the animation and execute the principles smoothly in a rendered video, to then critically review my work in full detail.
22/01/2019

After I have scanned in my key poses, I begin to import the images one by one and align them in order. The order is, walking, face up, crouch, jump and fallen. I do this because I can immediately remember what animation I should reference next.

I then blocked out the basic key frames, without any more detail as a starter to reference where I will add the follow through of arms flapping around whilst jumping to exaggerate the jump scare.
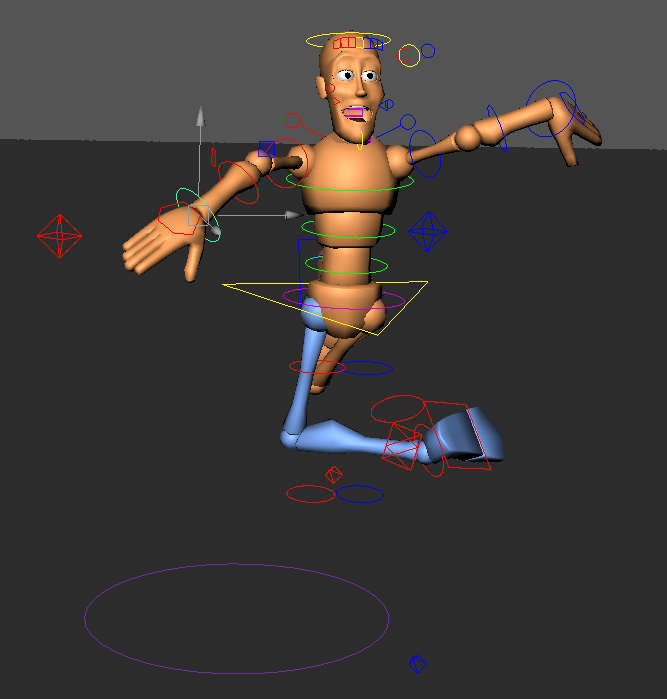
The method of animation I have used is moving one part of the body via rig-points, then I click on all to automatically select the entire skeleton. Finally, I press S to create a key frame from the current state. I have implemented the method described throughout my animation which consists of 154 frames at 25 frames per second and the result is a basic animation jump scare.
25/01/2019

Today I have focused on creating and keying the jump scare movements by only implementing the flailing arms and legs to follow the body levitating.
I moved each limb and captured frame by frame to accelerate his jiggling movements. I start from frame 174 to 205 in other words, whilst he is in the air. I ensured that the limbs are in a completely different position from one frame to another.
If you notice a few missing frames between 190 and 205, it is because I have reached the point where the key frames have carried the jiggling movement by itself without any additional frames and I have decided to adapt it as a smart method in order to ease the already difficult process.
I also fixed the timing of the animation by extending the last frame from 154 to 240 to allow some room for the aftermath especially. It was also used to improve timing as I have noticed after a few run throughs that the animation wasn’t timed correctly as some actions came on too early.
As a finishing touch, I have added a camera to then later on create a film scenery around the animation, which I will do in the near future. I clicked create> cameras> camera to simply create a camera onto the scene.
28/01/2019

Today I have only used the camera to move around with the character. What i have learned is that adding key frames to my camera, as long as the skeleton is not selected, doesn’t affect the character. To set the camera as my view point, I had to go to panels> perspective> (name of my camera), so mine would be “camera1” as it is the name of the camera I have used.
What I have done is to move the camera around the scene whilst creating keyframes by pressing S in the process to craft an animation which focuses on the character.
29/01/2019
Today, I have edited the camera to shake whilst the character is jumping.

This is screenshot evidence of many keyframes I have created in my camera for the sole purpose of creating further exaggeration of the scare.
To do this, I simply rotated the camera with only a few frames of difference. I rotate it left and right without moving the camera at all. After I found a perfect angle for the camera at a frame, I press S on the keyboard to save it as a frame.

I then changed my location of the images to my newly created images folder within the animation project. I set the files to JPEG images and changed the file extention section from one image to an animation, otherwise known as “name.#” to fill in the frame number. When it comes to renderable cameras, I only need to set “camera1” which is my main camera for the animation. When it comes to everything else I have not mentioned, I simply left them alone.
30/01/2019
Today I have rendered the animation from Maya to Adobe Premier pro to convert as an mp4 file

Only after I rendered all the frames from maya as a jpeg from 1 to 240 frames. I import the images as a sequence by ticking on the image sequence box. Once done
I open up a program called Premier Pro from Adobe (same developers of Photoshop and After Effects) to import a sequence of frames. This screenshot is the result of drag and dropping the animation sequence onto the main editor. Luckily my animation was just under 10 seconds, which is what I should be aiming for.
After a run through of the animation, I go to file, export, media to open the window as shown in the screenshot above. The format H.264 means it is an mp4 file. In the presets however, I changed mine to YouTube 1080p HD with intention to upload it to the platfom as evidence for my animation. Once I am confident about the settings I click export to convert the video to a .mp4 file.
This is the screenshot to a converted mp4 file. At first, I thought it was an acceptable animation to publish, however I later realized that it doesn’t have a floor. This means that I will have to render everything again to perfect the animation in full because i couldn’t tell whether the character was jumping.
31/01/2019
With yesterday’s mistake of having no floor, I decided to re-render the animation. This time I will remember to add in a floor to portray what the character is walking on and to stand out the jumping animation.

The first action I proceeded to do, is to add a cube then enlarge and flatten it to appear as a plane for extra thickness of the floor.
I tested the theory by performing a single Arnold render, and it worked just as I expected.
After I saved my original copy, I decided to paste a copy by saving over an already existing copy of my work.

This is a graph of my character animation, it has wavy lines everywhere towards the end.

In comparison, This is the animation graph for my camera. It doesn’t have a lot of movement mainly because it’s supposed to passively follow the player.
I deleted some keyframes from my character to refresh the jump scare movement.

I have changed the pose to appear to have jazz hands and scissors legs as an alternative. However, what I have realised when creating this is that it doesn’t mean an easier process, nor fewer keyframes to handle.

I go to file, project window to change my image saving location. I then proceeded to click on the folder next to the filename of my images to change my location to which ever animation images folder I chosen. For example, I have chosen images 3 from my animation project folder to keep the station tidy and separate different animations.

I change my render settings (the snap board with a blue cog) to change the settings from one frame to a slideshow. I changed the frame settings to a hashtag to loosen the rules on how many frames I can render at once. I then proceeded to set the start frame at 1 and end at frame 240, which is the last frame.
Before I call it a day with that animation render, I need to click on the render button. For animation however, I will need to click on the multi-render button on the top toolbar.

This is the icon I click to render multiple frames at once.

This is screenshot evidence for each separate images folder for each animation. It is located in my animation project folder.
01/02/2019

After all my animation frames have been rendered to individual images. I will need to find a way to compress them into a video. I open up Premier pro to import the images from the first animation as a sequence, by ticking the box above the file name.
As soon as the video sequence is imported, I immediately drag and drop the animation onto the main editor and tested the video by playing it.

After the playtest was sucessful, I go to file, export, media to open up the export window. I leave the format alone despite not being named .mp4, which it is already set at default. Next I changed the preset to YouTube 1080p HD.
I open a new project and import the key frames from a different folder with the same procedure. Then I clicked on open to import the files.
As soon as the animation sequence is loaded in, I drag and drop the sequence into the main editor without any changes within the software.
After the playtest was sucessful, I go to file, export, media to open up the export window. I leave the format alone despite not being named .mp4, which it is already set at default. Next I changed the preset to YouTube 1080p HD.

After I have rendered the second animation, I immediately gone to file, new project and only changed the name to animation 3.
I go to file and import, then my images folder for animation 3. Next, I checked the box that says “image sequence” to create a short video to simplify the process.
Whilst I played through the video, I have noticed a red flash with text. I investigated where the red screen was located and noticed that the frame is suddenly missing.
I investigated further to discover which frame has caused the problem, thoroughly going through each frame one by one. The frame that was corrupted was frame 73. This meant that I would have to render that frame again in attempts to refine the animation and remove any errors.

I have decided to discharge the corrupted frames, which resulted the separation of the video sequences. However, this wasn’t much of the problem as I only needed to join 3 videos in order. The frames that have been corrupted are frame 73 and 197.
After the process of merging the videos is complete I set the preset at YouTube 1080p HD for a high quality video and left the format alone as it is already set to mp4 by default.

I log on to YouTube to upload a video.
I have uploaded the videos by dragging 3 videos at once. Then I gave them an appropriate title and description each.
The final results
These are the 3 videos, that would’ve initially be one video because I created them in different versions. One with exaggerating limbs with a shaking camera, one without and jazz hands.
Evaluation
- How effective was your animation in telling your planned story? What went well? How could you improve your animation to tell your story better?
When I created the animation, I was fascinated by the narrative to the point where I almost forgot the principals, even though it is simplistic narrative of a character getting scared. The story of a jump scare was straight forward enough to be obvious to viewers, in my opinion. This is because
What went well for the animation when it comes to the story is the exaggeration jump as a highlight of the short story. It is exaggerated in a humorous way to emphisise that he is scared whit-less on what he saw as a result.
The way I could improve my story is to extend my animation to 30 seconds to be frank. This gives opportunity for longer jump scare time from 1 second to 5 seconds straight to improve timing from my view. Another way to improve my story is to look around before opening the eyes fully in shock to exaggerate the anticipation and smooth out timing.
- List the animation principles from your blogs which you planned to apply. How well did you apply these principles? Which principles could you apply better and by doing what?
I applied all 5 principals to my animation and I accidentally applied squash and stretch, when the character crouches down before jumping. As a reminder, the 5 principals were exaggeration, secondary action, follow through, pose to pose and timing.
I have applied exaggeration better than every other principal had in my animation, with the arms and legs flailing out like a loose hose pipe whilst jumping in the air even breaking the laws of physics as I weren’t aiming for realistic for this project. This is a far better option than the realistic approach, because it stands out from the jump scares inspirations I referenced.
I could improve the timing and the anticipation of the animation by extending the maximum time from 10 seconds to approximately 30 seconds for an opportunity to extend the parts such as walking and the jump scare itself to further emphisise the exaggeration.
- Are there any other things you could improve? Use of the graph, Time management, presentations skills, rendering?
I wish I can have the animation longer than 10 seconds, because looking back the timing is slightly choppy because I had to rush through the animation itself so no part of the animation can go on for too long.
Throughout my animation project, I practically didn’t alter anything with the graph at all. Instead I used key frames as an alternative. However, that doesn’t mean that I haven’t tried to use the graph as a replaced the additional key frames at all. In fact, I have experimented with that exact theory with the camera and the movements were completely different from what I expected creating a messy process. Yet, I have used the graph in my character to slightly tweak my foot movements to avoid overlapping the floor.
