Shootem up research
8 bit (galaga)

Back when Galaga was released back in 1981, the computers still only processed 8 bits on screen. The target audience was mainly aimed at the youth, as they were the main demographic age group at the time of the release. The budget was much smaller back then because gaming wasn’t as big of an industry as it is today. Although there is no proof of the figures, it was believed to be made under $1 million. Galaga’s artistic approach is pixel art 8 bit, a 2D top down shoot ‘em up game with simple events.
However, Galaga was simply an improved version of the previous entry of the genre, Galaxian (1979). In today’s standards, it is relatively clunky and has slow movements. Due to the limitations of the original galaxian, Shiguru Yokohama asked the Namco research and development team to create a more advanced powerful hardware. Since the new and improved hardware became usable, Yokohama would be able to implement more advanced graphics, smoother gameplay, enemies doing their own movements, shoot more bullets at a shorter time and even using more than 1 ship simultaneously. All these features mentioned were not in the original Galaxian, yet it was in Galaga.
Its target audience was rather general, as the main purpose is to attract as many people to its cabinet as possible. However, from the appearance of the gameplay, it seems to be aiming at young boys who love space based entertainment, as it is already set in the galaxy in outer space.

16 bit (super thunder blade)
Super Thunder Blade is a 2D shoot ‘em up that tried to look 3d by facing front. From its appearance, it tries to reach out to an audience of boys who like action, military and shooting involving flying. It is also meant to impress audience with the advanced 16 bit graphics that would make Sonic the Hedgehog look like an Atari title. There weren’t many levels. The reason it had to settle with 2D game with 3D illusion is because the Mega Drive cannot handle too much 3D. There has been exceptions with 3D graphics such as Star Fox for the SNES, however it only released a few years after the release of Super Thunder Blade, which indicates that the 3D skills hasn’t been fully discovered yet as there was too limited power. The game was aimed to be graphically detailed and enemy intensive.
Based from this screenshot image, the game has used the parrallex scrolling in a sophisticated way, where the buildings would scroll the fastest and the city itself would only be the background. This is realism in an advanced level at the time because the game cartiges could only process 16 bits.
32 bit (R-Type Delta)
-1491740291.jpg) The game is a 1998 2D side scrolling shooter, built with 3D assets. Originally built for the PlayStation 1 (1994), the game had to go through graphical limitations such as 2D special effects for a 3d game as it could only take up 1-2MB (megabytes) of RAM (random access memory). This meant that the developers had to get creative and figure out on how to fit in all the UI, the VFX and the models into one screen without affecting the performance.
The game is a 1998 2D side scrolling shooter, built with 3D assets. Originally built for the PlayStation 1 (1994), the game had to go through graphical limitations such as 2D special effects for a 3d game as it could only take up 1-2MB (megabytes) of RAM (random access memory). This meant that the developers had to get creative and figure out on how to fit in all the UI, the VFX and the models into one screen without affecting the performance.
Parralax scrolling is when multiple layers of background move at different speeds to give a fake illusion of depth, which they have done well with the focused layer being 3d models themselves as well as the outer layers being simply 2D sprites and the sky at the very last, not moving at all. All this create a result of a more immersive, detailed world that is bound to testify the limitations of the original Playstation.
The target audience are generally aimed for fans of the shoot ‘em up genre along with attempting potential new customers with its impressive 3D graphics
Based on those 3 games in different eras. I am going to base my game in a sci fi world and with references of other games not covered in this research. I am going to limit my graphics to 16 bit for the aesthetic, because that is what I felt that is best. I am going to base the artistic style around the Sega Mega Drive. The main 2D problem they faced was the technology limitation. However, since the computers are more advanced and powerful since then, I would only add in extra content that would otherwise not be possible on previous systems. One example of this is fitting in multiple times more bullets than ever before thanks to the processing capabilities of modern computers.
The ideal concept of the game would be the difficulty would have to challenge the player with gradual intensity. My Shooting game would be set in different planets in space, as well as inside the black hole and different solar systems. The bosses will have various tactics to keep the player interested and challenged as well as different abilities for each enemy. The basic requirements is that the game has to be playable and running at a smooth frame rate, which means 30 frames per second should be the bare minimum although 60fps would be considered ideal. As a standard for shoot em up games, there should be various different enemies each with their own skills and should have different background music for each level.
References
http://www.cyberiapc.com/vgg/sony_ps.htm
https://www.libertygames.co.uk/blog/how-arcade-machines-work-the-operating-system/
Image sources:
https://en.wikipedia.org/wiki/Galaga
https://www.emuparadise.me/Sony_Playstation_ISOs/R-Type_Delta_(Japan)/176921
The Planning

This is my basic moodboard about the game concept. It coveres everything from the graphics, gameplay, what game genre it is and how the game challenges the player. I will use these as a starting path of game development as a direction on how the game will end up.

This is a simple moodboard for inspiration of my game. Although the images seem drasticly different, they are rather similar when it comes to the basis of the game. The screenshot of the game Super Thunder Blade is how the game would play, yet it would be a sideways shoot em up with Sega style graphics. I also have a random image of space, because that is where the game would be set, each over different planets and obviously the jaggered circles, described as “bullet hell”. I have used bullet hell screenshots as an indicator of the final difficulty of the game, when the player almost reaches the end.


This is how I design my player and other enemies as portrayed by the 2 examples provided. I start off using photoshop and draw a random shape for each ship, based on various shapes on ships in real life (sometimes, completley made up too), it starts all in the black basic shape first. Once the shape is finished I began with the outline, the colours and the shading in that order. The difference between the two is I have changed the method of shading from individually colouring in with different colours to using the burn tool, which would automaticly darken the selected areas. I then export them as a png file.


These are basic concept sketches of all the world maps that I could choose from. Since this is the assignment, I am only going to choose one as I have to consider the file size submission. They are only basic samples of sketches on how the world would look like. I also have to consider the colour and the shading of the worlds to enhance detail on a 2D game.
The Development
I began to create a game using Unity, with a help from MonoDevelop (Unity Provided coding software) and Photoshop (sprites). It will be a simple 2D shoot’em up with various enemies based in different worlds. For now I appropriately called it Shmup, abbreviated for shoot’em up, as I don’t have an official title yet.
24/01/2019

This is my player character design created from scratch using Photoshop. This is the basic version of the art as I will create a more detailed version later on to quickly create a game.
I then opened up unity and inserted the sprite of my newly created character.
This is evidence on where my folder is that I drag and drop every sprite from.
I implemented a polygon collider to customize my collision shape to match the ship in order to make the game fair for players. I then inserted the rigidbody2D and checked the trigger box.
I have tested the game and notice how I have changed the background. What I have done was to only change the background colour from the camera view.

I then create the code dedicated for the player character movement.
I then created the box for the time being to test out the borders. I made the boxes invisible and added a box collider. The result is to collide with the player to prevent it from going out of screen.

I have created more sprites for the purpose of animating the character to immerse the player that it takes place in the sky.
to open the animation I first went to create> animation, to later on drag it onto the inspector of the player. Next I go to window> animation to then control the animation, as shown in this screenshot here.
I went for decent gaps to blend in with loops.
This is the behind the scenes for my character movement. In the code, it contains information about classifying variables, the controls of the character (movement) and the speed it travels. The code includes mathf.clamp which means how far a character can go before it stops. 
I have tested the game again and the shooting button works as expected and the invisible barriers are effective.
This is the code for the bullet movement, at the moment. It is simple compared to the character movement because it doesn’t have as many lines. It basically tells the bullet to only go right at a selected speed decided by the public variable (how fast I want it to be).
This is the current state of the character, includes the fire button.
07/02/2019

I have noticed that none of my objects are tagged. This could be tricky to identify objects later on throughout the development. I am going to tag objects starting from the player.
I began with tagging the player from “untagged” to “player” in the right hand corner.

As there is no enemy tag at the moment, I decided to create a new one specificly design to round all the enemies into one group.

I created a tag for the enemy by selecting in the tag section. This only appears when the enemy is selected.
I modified the polygon collider to orient it to the direction of the sprite. I simply moved the points and i have used the control button to remove a few points. This is what the finished result looks like.
08/02/2019

I have changed the code slightly to change the direction of the enemy and to destroy itself when it hits the player bullet.
I open up Adobe After Effects to create an explosion sound effect for when the enemy collides with a bullet. I have only used the enemy sprite that I have created in Photoshop, rigged with a shatter effect. I then added the particles effect to appear as an explosion via, Effect> Simulation> CC particle systems II.
Once I have figured out the ideal effect and timing through numerous adjustments, I go to Export> Add Render Que to save as individual images per frame. I change the colour settings to “RGB+Alpha” and ensured that I have a seperate folder only for the animation.

I return to Unity only to drag and drop the entire animation onto prefabs section under an animation folder.
I open up the animation window and moved the animation frames in order to create the same animation from After Effects. It took figiting, yet I found that 35 fps is the smoothest frame rate for the explosion.
I have modified the enemy script to play an explosion after its death. I simply dragged and dropped the enemy explosion animation onto the empty box where the animation would play.
11/02/2019

I have created a new game object for the sole purpose of inserting a background. It is a 3d object called Plane which is a flat surface.
This is the background I would be testing on. It is a quick draft on the idea I would like the background to be, so I didn’t spend too much time on the background because I would need to test the background first.
I saved the background as a PNG file onto my Assets folder within the project itself, so I can easily reach it.
I also created a cloud in a black background with is just faint white patches to appear as clouds for added realism for the game.

I return to Unity to add a new background and apply it to my background plane.

I enlarged the plane to cover the entire camera view. I have also rotated the asset to -90 degrees in the X axis for visibility purposes.

I create a new material for the background itself, with a few changes. I changed the albedo section to the background image itself and changed the source to metallic alpha with the opaque rendering mode.

I have dragged the background into the plane’s component list and this is the result.

When I tested the background, it was too dark to the point of barely visible.

This code is to give control to me to determine how fast I want it to scroll.

I have set the rendering mode to opaque and the shader to standard unlit, through the particles section.
I have created another material asset for the cloud background. The only change I have made is the shader to be an additive to remove the black background. I then stretched out the entire cloud picture to fit within the camera. The difference being that the earth background is now more believable.
13/02/2019

This is my 2nd enemy’s code. The function appears as a bullet movement, however, the enemy is supposed to drag sideways to increase difficulty to the player.
In the Vector3 code, I have implemented the random range in the second section (y axis) from 2 to -2 for variety purposes to keep the player on their toes.
15/02/2019

This is the rigid body for my player. To stop the player from rotating upon collision, tick the box that freezes rotation in the Z axis.
07/03/2019
Today was about improving the graphics for the game

This is my enemy 2 as I visioned it. I have created this sprite using Adobe Photoshop. Rather than colouring in the shadows individually, I decided on a lazy approach to use the burn and dodge tool to lighten and darken certain spots to make the enemy look more organic.

This is the 3rd enemy which would be the first to shoot bullets. This is my first attempt on the sprite.
28/03/2019
I was unable to access Unity because I have altered my project with a different version and the prefabs were declaired “missing”. However, this was a good opportunity to improve the mediocre graphics into the standard to blend in with the rest of my game.

I began the process with After Effects on re-doing the explosion. This time I do 2 layers of the explosion duplicate. I have used the faded sphere for a fire explosion effect with 0 gravity. On top of that, I used emboss, which can be accessed by Effect> Stylize> Emboss, for padded detail which stands out from the particle itself. I have only used the shatter effect on the imported sprite (enemy or player) and cut the effect before the key frame visibility of the explosion reduces to 0.
In Photoshop, I gone and edited the bullet graphic and it looks too basic. Therefore, I changed it to a more detailed bullet, complete with outline and basic shading with under 16 colours.
This is the result of the edit. The size has increased 70% larger than the original image. I will only then import it as the main bullet sprite in unity and it would reset as the new sprite.
29/03/2019

This is the process of recreating the explosion effect that I have tried yesterday.
After I have created the effect for one sprite. I go into composition> add to render queue. This will open up the render queue to process my work. Before I render the animation, I need to change the settings to a PNG sequence and to RGB + alpha, then I will choose a folder location on where I want to save. Once completed, I press render.
I do the exact same process, except creating the explosion as it would be created from a template from scratch, only with a different sprite to render the explosion animation.

In my player script, I have told my code to only play the shooting audio when I fire the shoot button.
The code is “GetComponent<AudioSource>().Play();” meaning that it would play the audio at the selected time as I have already disabled “play on awake”.

In the prefabs section I have only inserted the audio source and set it to loop, with the enemy spawner as an example. This will loop the music as soon as the game starts.
I created another level to create a start menu from scratch. It involved creating a new canvas from the start and then creating 2 buttons, which one will load up the level. I had to create a separate script for the start game button to load up the level which has the gameplay.
Word of notice, when creating a HUD for the game, the HUD will appear larger in edit mode. Do not attempt to fit the canvas within the camera as it would shrink the canvas to the miniscule size, too small to read.

This is the code for the start button itself. The code allows the button to have additional powers to access other levels in my game. In this example, the level will load once I click on it.

This is my new background. The difference is staggering and now it looks like a proper background rather than just random 2 second drawing.

I am now going to export the game in order. The main menu first as the start of the game, which will lead to the main level.
To access this, I went to file> build settings and once I have selected the PC platform and arranged the order, press build. This will be saved onto my new folder which is created by the build function.
Results
This is the video of the game play demo.

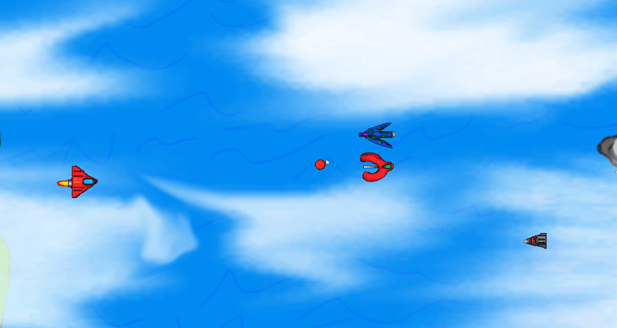
This is the screenshot of the game play.
Evaluation
I tried to work towards a 16 bit Sega style graphics in my shoot ’em up game. I did this, simply by applying the burn tool in Photoshop in edges to give it a pop effect and enhanced realism. However, this wasn’t my first method of the art style. In fact, I have tried the shading pixel by pixel via pencil tool for the graphic. It worked for my player, especially the window, however I have discovered the burn and dodge tool to be more effective, even though it technically exceeds the 16 bits.
This overall works effectively, because it immerses the player into the game to be realistic looking, whilst looking nostalgic. This is the best method because it simplifies the process of shading the detail on sprites as it sheds the time process with a major difference and it turned out better than if I have kept to the traditional shading in my opinion.
My art work resolution wise are usually created through 72 pixels per inch, because it combines the aesthetic of the early games and still be able to shadow enough detail for realism in a 2D scale, without any technical external tools. This is despite that I was creating 16 bit style graphics. At size, I ensured that all the sizes for enemy sprites are the same, despite different shapes with exception to one enemy. When a sprite has an animation I made sure that I give extra room to allow the action without cutting through the edges.
I didn’t really follow the rules on colour limitations of the entire game and I have decided to for each sprite and background to have its own colour pallet and the game became more colourful as a result. I do not regret this action because it has a wider colour variety, therefore it draws interest to the player, rather than a limited colour usually found in NES games, especially in today’s standard for 2D games.
My game has utilized the mechanics of a standard shoot ’em up game genre by having a smooth movement, an unlimited fire rate (fire as many times without any delays), and the continuous waves of enemies flowing onto the screen to purposefully increase the difficulty for the player as a challenge.
I used the burn and dodge tool in the edges to create my art in Photoshop for my graphical sprites. It went well because It saves time, it increases detail in the correct way which I have envisioned. If I were to individually draw the shades through pencil tool, the game would be nowhere near the state that it is currently in due to the excessive stress on perfecting the lighting and shadows positions.
Overall I met my initial purpose in these ways of the graphics, even though they are technically not 16 bit graphics because of the many colours that would not be possible with the Mega Drive cartridges. On the game play itself, the game has almost met it’s purpose, only because I had to cut the corners in order to readily present and showcase on March 29th 2019. However, it has smooth game play and a comfortable wave of enemies, nevertheless the animations are rather impressive because they fit within the game with its almost realistic explosion, let alone the little time required to create them from scratch, this was only after a few practices. Overall, I am impressed with my game so far and I do believe it fits my vision to be a space based shoot ’em up with retro graphics.
